We are happy to share our photos and tutorials with anyone interested in spotlighting our crafts. Please be sure to link to our original posts and give us credit for our work. Thank you for your consideration and respect. We hope you enjoy our blog!


Friday, December 31, 2010

Noise Maker

A home-made noise maker to help bring in the New Year or to use at any celebration.

Photobucket

What You'll Need:

- Empty water bottle

- Tissue paper

- Elmers white glue (or modge podge)

- Paint or sponge brush

- Dried/uncooked beans

The How To:

- First tear or cut your tissue paper into strips.

- Next paint your water bottle with the glue

- Then add put the tissue paper on the bottle

- Now paint a coat of glue over the tissue paper on the bottle

- Let it dry

- Then fill the bottle 1/3 to 1/2 way full with the beans.

- Put the lid on the water bottle tight and you have your noise maker to help you celebrate!

Wednesday, December 29, 2010

An Icee Suncatcher

Here is a fun way to add a little color to the outdoors during winter time.

Photobucket

What You'll Need:
- Ice cube try

- Food coloring

- Water

- Round cake pan

- Freezer

- Ribbon

- Plastic cup

The How To:

- First fill your ice cube try with water.

- Then add a drop of food coloring in each slot. Don't choose more than 3 coordinating colors because they will bleed together a bit later on.

Photobucket

- Next put your ice cube trays in the freezer until all the way frozen.

- After they are frozen, get out your round cake pan.

- Fill it about 1/2 to 2/3 full of water.

- Put it in the freezer for an hour.

- After that, you will add a plastic cup (I used a child sized cup and plastic works better that paper....found that out the hard way) with water in it. This will be where you hang it by the ribbon.

- Then add the colored ice cubes to the water in the cake pan.

Photobucket

- After it is frozen remove the plastic cup from it. If you have difficult removing it try dripping some hot water around the edge of the cup to help loosen the ice around it.

-Then pop that big chunk of ice out of the cake pan.

- Add some matching ribbon and find a place to hang it outside.

Here is what the front side of it turned out to look like....

Photobucket

Photobucket


...And here is the backside.

Photobucket

Photobucket

Monday, December 27, 2010

Cutie Bookmarks

My girls all got books for Christmas and so we decided to make some cute and easy bookmarks for them to use.

Photobucket

What You'll Need:

Photobucket

- Ribbon

- Buttons

- Craft foam shapes

- Hot Glue Gun


The How To:
- First you will need to cut your ribbon about 12 inches long.

-Next pick out 4 foam shapes per ribbon

-Then, using the glue gun, glue a foam shape on an end of the ribbon.

Photobucket

- Now, glue a second foam shape to the same end.....be sure to 'sandwhich' the ribbon between them.

-Do the same thing with the other 2 foam shapes to the other end of your ribbon.

Photobucket

-Finally hot glue your button (if you want one on it) to your foam shapes. Then you're done and your bookmark is ready to use.

Photobucket

Friday, December 24, 2010

Chocolate Candy Cane Spoons

 Here's a fun way to sweeten up your hot cocoa!

What you'll need:
-Plastic Spoons
-White Chocolate Almond Bark
-Candy Canes

The how to:
-Melt the white chocolate and dip the plastic spoons in it.
-Crush up the candy canes and sprinkle them over the chocolate covered spoon.
-Set them on wax paper until firm.
 -Once chocolate is hard they are ready to use.

Wednesday, December 22, 2010

Hand Print Wreath

What you'll need:
-Fabric or Paper
-Green & Red Paint
-Red Ribbon

The how to:
-Paint your child's hand green and press it to the fabric or paper in the shape of a circle.
-Dip your child's finger in the red pain and press it in clusters of three around the  circle.
-Tie a bow with the red ribbon and place it at the bottom of the hand print circle.
-Add a 'Merry Christmas' above the wreath and it's ready to hang.

Monday, December 20, 2010

Photo Wreath

What better way to decorate for the holidays than with this photo wreath of your loved ones.

 
What you'll need:
-Photos
-Paper (2 colors)
-Cardboard
- Glue
-Ribbon
-Scissors & Pattern Scissors
The how to:
-Use a cup to trace the circles around your pictures.  Cut them out.


 -Glue the photos to your first paper choice and cut a circle, 1/4 inch larger than your photo.
-Glue photos second paper and cut around it with the pattern scissors.


-To make your wreath more stable you'll need to cut a cardboard circle to glue your pictures onto.   To do this place all your photos in a circle and find a plate or dish that can be used to trace the cardboard circle.  Make sure the dish stays within the picture ring.


-Cut out the cardboard ring and glue your photos onto the ring.


-Glue or tape the ribbon onto the back of wreath and tie the bow.  

Saturday, December 18, 2010

Gift Toppers

An adorable way to put some of your cardstock to use as a gift topper.
Photobucket

What You'll Need:
- Card Stock

- Scissors

- Glue Gun

The How To:
-First cut a square out of your card stock. It doesn't need to be a perfect square. (This one is 5x5)

Photobucket


-Next draw a swirl filling the whole square. The farther apart the lines the 'taller' the flower and the closer together the lines the 'shorter/flatter' it will be.

Photobucket

-Now you can either cut or tear the paper along the line.

Photobucket

-Then, begining with the center of your swirl, start rolling it. I started by rolling it tightly at first and then looser as I went on.

Photobucket

- When the flower looks how you want it to, put a drop of hot glue on the end and push it to the flower so it won't come loose/unraveled.

-The next 2 pictures show the difference of if you cut the swirl or tear the swirl. Look at the edges of the flowers to see the difference.

Photobucket

Photobucket

-Now, if you noticed you can see the table through the flower. So I cut a circle and hot glued it onto the bottom of the flower.

Photobucket

-Then hot glue it onto the present you want to decorate.

Photobucket

Thursday, December 16, 2010

Chocolate Peanut Butter Crackers

National Chocolate Covered Anything Day!

Try this simple and sweet chocolate covered treat!

What you'll need:
-Ritz crackers
-Chocolate, Almond Bark
-Peanut butter
-Sprinkles

The how to:
-Spread peanut butter between two crackers.
-Dip crackers in melted chocolate, shaking of excess chocolate.
-Place on wax paper and touch up finger prints.  Then sprinkle with some color.
-Let sit until chocolate has set.

Now don't stop there!  You can dip almost anything in chocolate!

Wednesday, December 15, 2010

Chocolatey Treat

I love easy to make treats around the holidays. You'll love this chocolate and peanut butter cookie bar just as much as my kids do.

Photobucket

What You'll Need:

- 9x13 pan

-Tin foil

- About 8 Graham Crackers (broken in half)

- 6 Squares of semi-sweet baking chocolates

- 3/4 Cup Peanut Butter

- 4 oz (or 4 squares) of white baking chocolate

The How To:

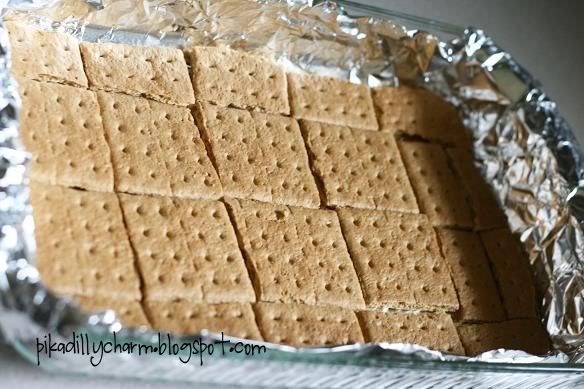
- First line your pan with tin foil.

Then arrange the graham crackers to they cover the bottom of the pan. You may need to cut a curved corner on the pieces that fit in the corner of your pan.

Photobucket

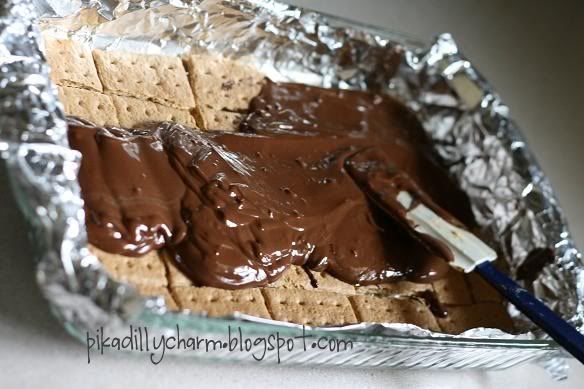
- Next, put your semi sweet sqaures and your peanut butter in a microwave safe bowl. Microwave on high for 1 to 2 minutes....be sure to STIR your chocolate/peanut butter every 30 seconds until it is melted.

- Then pour it over the graham crackers and spread so it covers all of the crackers.

Photobucket

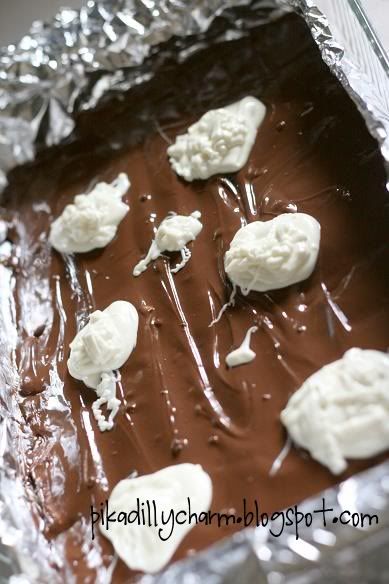
- Now, melt the white chocolate the same way. Being sure to stir every 30 seconds until melted.

-Drop spoonfuls of the white chocolate into the pan.

Photobucket

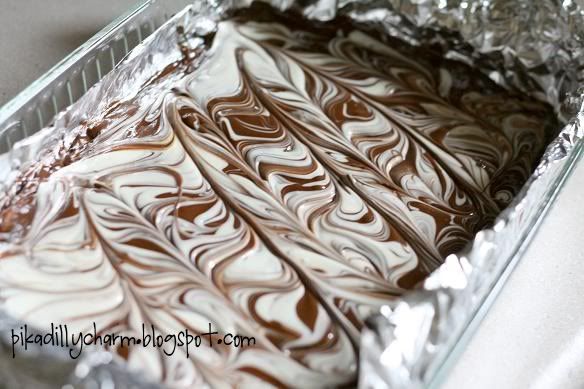
- Use a knife and drag it through the white chocolate to swirl it with the semi-sweet chocolate. If you swirl too much it will just turn muddy looking.

Photobucket

- Now stick it in the refridgerator for an hour or so until it is firm.

-When it is firm, hold the tin foil and lift it out of the pan. Then peel the tin foil off of the treat.

-Next, use a knife to cut it into bars. And serve and enjoy!

Photobucket

Monday, December 13, 2010

Window Decorations

This is such an easy and beautiful way to add some holiday cheer to your windows.

Photobucket

What You'll Need:

- Ribbon (2 or 3 in different colors, textures, and/or widths)

- Ornaments of various sizes

- Existing window with a curtain rod in it.

- Fun ornament hooks (optional)

- Strand of Beads (optional)


The How To:

- First cut various lengths of the different ribbon.....one for each ornament.

- Tie them onto an existing curtain rod. Be sure to mix the different lengths and color of the ribbons around as you tie them on.

**Note** If you are not using ornament hooks, you will need to string the ribbon through the ornament before you tie it on the curtain rod.

- Put a hook on the ornament and then hook it onto the ribbon. Again, mix the different sizes and colors of the ornaments up....so 2 of the same are not next to each other.

-For an added touch, I put a strand of beads on the curtain rod. Kind of twisting and draping it as I went.

Photobucket


And here's the finished product. Very simple to do and it used things that I already had on hand around the house.

Photobucket

Friday, December 10, 2010

Ribbon Wreath

 This wreath is beautiful and simple to make.
 
What you'll need:
-Three Spools of Wire Ribbon (all the same color or three different colors.  8 yards each, 24 yards total)
-12" medal ring

The how to:
-Tie the ribbon onto the ring, alternating colors as you go.  Tie each bow before cutting it off the spool. You will tie about 36 bows.


-Once all bows are tied on, evenly space them around the ring and reshape the ribbons. Pull them forward until it has a nice full look.   Trim any long pieces or strings.

Wednesday, December 8, 2010

Hand Print Snowman Ornament

Here's a fun activity for the family or a school Christmas Project!


What you'll need:
-Blue plastic ornaments (Or any color you choose)
-White Paint
-Colored Sharpie Markers (Your choice)

The how to:
-Paint your Child's hand with the white paint.
-Slowly wrap your their hand around the bottom of the ornament. Making sure all the fingers touch the ornament. Or you'll end up with a floating snowman head like mine.
-Hang up to dry.
-When dry use the colored Sharpie markers to draw the hat, scarf, face, arms and buttons on the snowman.

And there you have it!  
A sweet keepsake ornament your Child will look forward to placing on the tree each year!

Monday, December 6, 2010

Service Tree

About this time of year my Children start to pepper me with all the stuff that they want.  But this Holiday Season I wanted my Children to focus on giving and serving others
  instead of thinking about themselves so much.  Here is an idea that has helped our family.

What you'll need:  
-Clear container of some sort. (Mine is a glass Christmas Tree.)
-Pom pom balls. (Or what ever you choose to fill it with)

What to do:
-Every time your child does a service or is kind to someone else, let them choose a Pom pom to place inside the container.

-Explain to your child that each Pom pom ball represents a gift they are giving to Jesus.  When they are kind and serve others it is as if we are doing it to Jesus. 

-Help your Children learn to look for ways to serve others. Help your Child make the bed of their Brother or Sister and leave a paper heart on their pillow with an 'I Love You' on it. (Make a bunch of paper hearts with I love you on them in advance) Help them see that service,(especially secret service) is fun and will make them, the other person and Jesus happy.   Encourage them to fill the container to the top by Christmas Day! 

-On Christmas Day, before anyone opens any presents, show the whole family how full the container is and praise them for their kindness and service to others.  Express the feelings that Jesus has when we are kind and serve others.

-Now the above ideas a defiantly geared toward younger children. Now if you have teenagers , try filling it with candy or money.  Then pick a family to take it too.  With a note, leave it on their doorstep Christmas morning!  knock and run! 

 I hope this activity helps to make your Christmas Holiday a happier one.

-

Saturday, December 4, 2010

Friday, December 3, 2010

Cardboard Flower

Living Green


If you have any of the empty paper towel tubes, heres a great way to make something cute with them.

Photobucket

What You'll Need:
-Empty paper towel tube

-Scissors

-Spray Paint (optional)

-Candle

-Hot Glue Gun


The How To:
- Take your empty paper towel roll and spray paint it whatever color you want. I did mine white and I sprayed the inside of it white as well.

Photobucket

- Next cut it into 1/2 inch thick pieces.

Photobucket

- Then, using the hot glue gun, glue them together. I put a dot of glue on the center of the inside edge of each piece. This is to help it curve or slant around into a circle.

Photobucket

- As you glue them together be sure to check every once in a while to see if it is shaping right around your candle. Be sure to check and make sure that the cardboard tube is NOT going to be too close to the flame of the candle...wouldn't want anyone to start a house fire. =/

Photobucket


And, wa-la, you have a cute little way to spice up your candles.


Photobucket