We are happy to share our photos and tutorials with anyone interested in spotlighting our crafts. Please be sure to link to our original posts and give us credit for our work. Thank you for your consideration and respect. We hope you enjoy our blog!


Showing posts with label Spring Crafts. Show all posts

Sunday, April 8, 2012

Spring Candy Nest

Here is a fun and super easy way to celebrate the coming of Spring!


What you'll need:
-1 bag Chow Mein Noodles (Crispy)
-1 bag Butterscotch chocolate chips
- Robin Egg Candy (I used Cadbury-mini-eggs) 
Optional - (I added 1/2 cup of semi-sweet chocolate chips, for a darker color)
-Cupcake pan

The how to: 
-Pour butterscotch chips into a microwave safe bowl.  Microwave chocolate 1-2 minutes, checking every 30 seconds until melted!

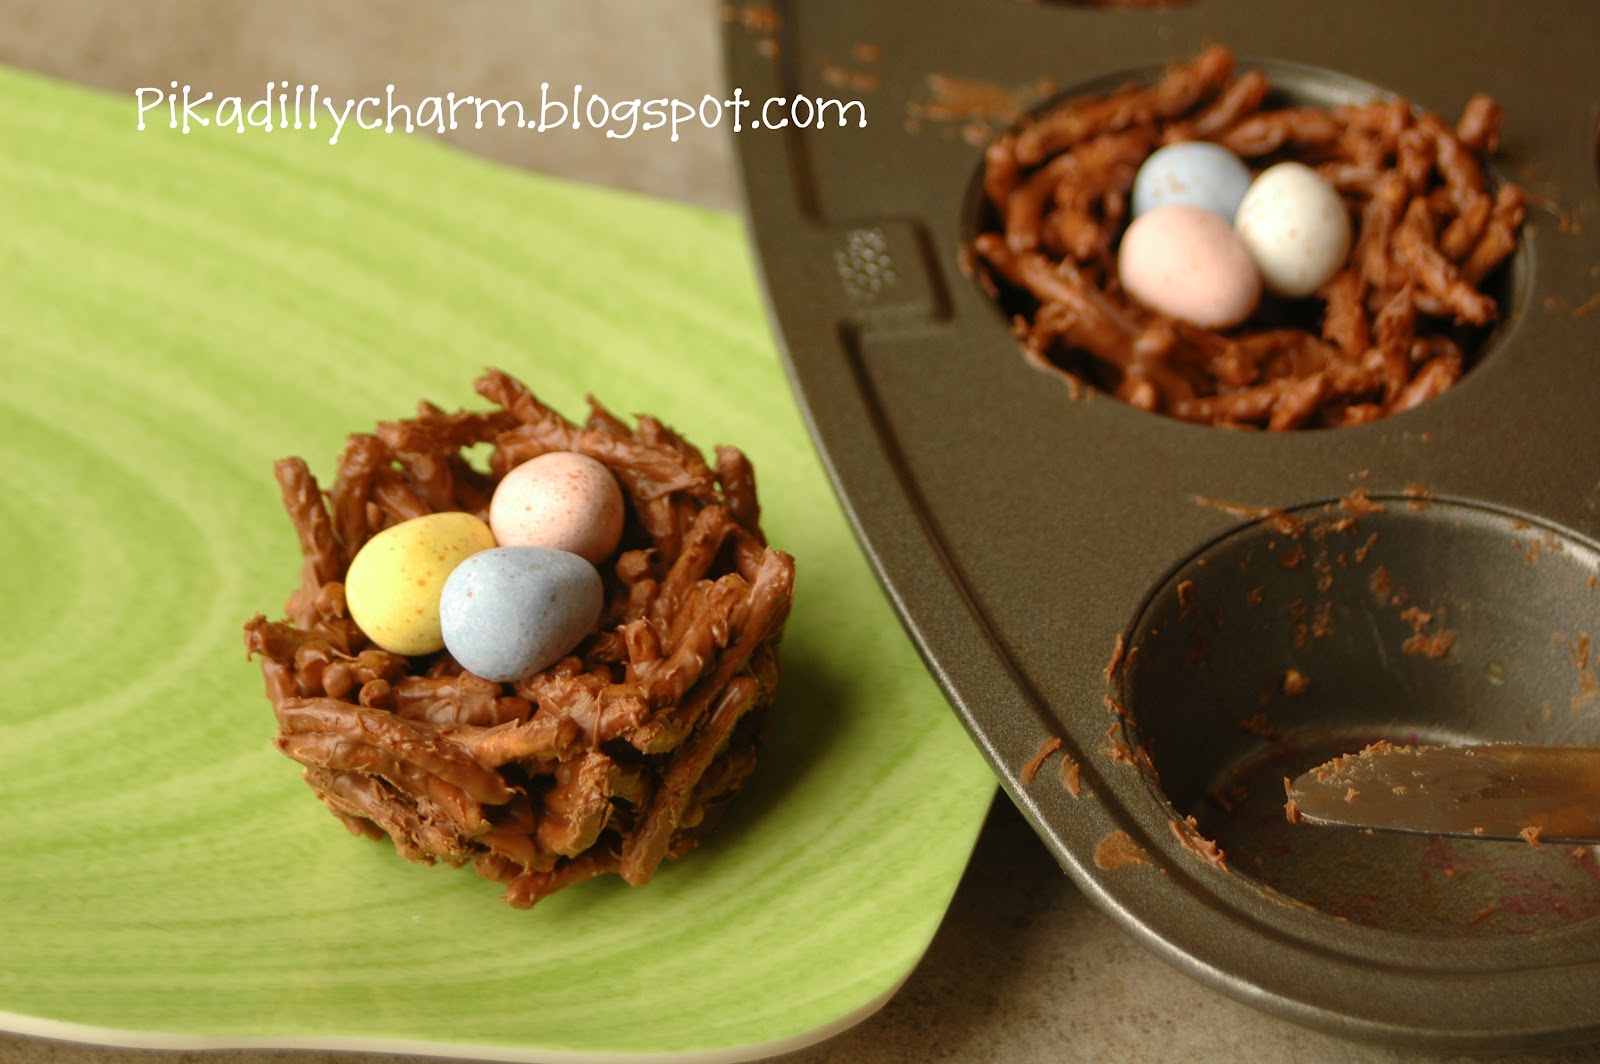
-Pour the whole bag of Chow Mein Noodles into the melted chocolate and mix until evenly coated.

-In a greased muffin pan spoon chocolate covered noodles into each muffin cup and shape as a nest, leaving a little indentation in the middle.

-Place the candy robin eggs into center of nest.  Let the chocolate harden.

-Use a knife to pop nest out of the muffin pan.

-You can place each nest in a paper muffin liner if desired. 

If you don't want to use a muffin pan you can can shape each nest on wax paper.  This method creates more of a realistic look and it allows you to make the nest as large or as small as you want.

 I wanted to take these to some friends so I filled the bottom of a plastic cup 
(Short & wide, Elegant style cup)  with some candy, then dropped my cute paper lined nest into the cup and wrapped it with plastic wrap and ribbon.


Wednesday, May 4, 2011

Seed Paper Card

For Spring I thought that it would be fun for the kids (with some adult help) to make some cards with seed paper as part of them.
Photobucket

What You’ll Need:
- Scraps of construction paper
- Blender
- Packet of flower seeds
- Wooden spoon
- Water
- Dish rag
- Colander/strainer
- 3 towels
- Pieces of felt (optional)
- Scissors
- Blank card or a piece of card stock
- Glue
- Pen/pencil

The How To:
- First tear your construction paper into small pieces and put them in your blender.
- Then add enough water to cover the paper and then blend it up.
I was really hesitant to do this in my blender, but it didn’t hurt my blender at all.
Photobucket
- If needed you can add a little more water to it.

It should look something like this:
Photobucket
-  Next, unplug your blender.

- Now add some seeds to your paper mixture.
Photobucket
- Then gently mix the seeds into the mixture.  Be sure to use your wooden spoon for this!
Photobucket
- Next I put my dish rag in the bottom of the colander/strainer and then poured the mixture out of the blender onto the dish rag.
This is to help drain some of the water off of the paper and keep it from falling through the holes in the colander/strainer.
I usually let it sit like this for 5-10 minutes to help drain as much water as possible.
Photobucket
-  Then I place a towel down on the counter (mine is the black one)
- On top of the towel I put the piece of felt (optional)
- Next comes the pouring of the paper mixture out of the colander and onto the felt.
- Now, using your hands, gently spread the paper mixture out on the felt.
Photobucket
Photobucket
- Then I take one of my other towels and put it on top of the paper and gently press on it to help absorb water off of the paper.  When that towel is wet I change it out for my other towel.  I do this a few times through out the day to help speed up the drying process.  And then I let it  sit out over night uncovered.
Photobucket
- Another way to help speed it up is by using a hair dryer on it.

- When it is dry it will be like stiff paper.  Decided what design you want to create with it then draw or trace it on to the seed paper.
- Next cut it out.
Photobucket
- Lightly glue the seed paper on to your card/card stock.
- Then draw (or have your children draw) the rest of your picture with markers, crayons, colored pencils, etc.
- On the inside be sure to put a note in it that the seed paper can be planted and they can grow their own flowers with some TLC.
Photobucket

Tuesday, April 19, 2011

Little Cottontail Hat

Photobucket
This pattern is for sizes: Infant/Toddler
I used a size G hook/4 mm.
Round 1 Ch 3. Join 1st and 3rd chain with a slip stitch. Then 4 dc in each chain [12 dc]. Join with slip stitch in top of first dc.
Round 2 Ch 2, 2 dc in each dc around. Join with slip stitch in top of first dc. [24 dc]
Round 3 Ch 2, *dc in next st, 2 dc in next st. Repeat from * around. Join with slip stitch in top of first dc. [36 dc]
Round 4 Ch 2, *dc in next 2 sts, 2 dc in next st. Repeat from * around. Join with slip stitch in top of first dc. [48 dc]
Round 5 Ch 2, *dc in 7 dc, 2 dc in next dc. Repeat from * around. Join with slip stitch in top of first dc. [54 dc]
Round 6 Ch 2, dc in each dc around. Join with slip stitch in top of first dc [54 dc]
Round 7-12 Ch 2, dc in each dc around. Join with slip stitch in top of first dc.
Round 13 you can do a sc in each stitch around. Fasten off.

Ears
Make 2 outer ears using white.
Row 1 Ch 37
Row 2 Sc in 2nd ch from hook, (sc in next ch, hdc in next 4 ch, dc in next 4 ch, triple crochet in next 16 ch, dc in next 4 ch, hdc in next 5 ch, sc in next 2 ch)
Row 3 Ch 1 and connect to other side of ch 37 with a sc.  Then (sc in next ch, hdc in next 4 ch, dc in next 4 ch, tr in next 16 ch, dc in next 4 ch, hdc in next 5 ch, sc in next 2 ch)
Row 4 Ch 1 and connect to other side with a sc. Then (sc in next ch, hdc in next 4 ch, dc in next 4 ch, tr in next 16 ch, dc in next 4 ch, hdc in next 5 ch, sc in next 2 ch)
Row 5 Repeat row 4 and fasten off.
Photobucket
Photobucket
Make 2 inner ears with color of your choice
Repeat Outer ears Rows 1-5
Stack ears together and connect with a sc around.
Use a yarn needle to sew on ears. I suggest that you try the hat on the child before attaching the ears so you can get a better idea where to put the ears.

And I have to end this post with a few more pictures of this little cutie in the hat.  Enjoy!
Photobucket
Photobucket

Wednesday, March 30, 2011

Not your average Flower

Now I have seen and have made those tissue paper balls.  But here is a little twist to it…. I used napkins instead of tissue paper and I love the look of it.

Photobucket
What You’ll Need:
- Large and small party napkins (I got some of mine from the dollar store)
- Scissors
- Twist ties (like the ones from garbage bags or loafs of bread) or string or even teeny tiny rubber bands (like the ones for little kids hair)

The How To:
- First decide which color napkins you want to use to create your flower.  Pick 2 colors.
Photobucket
- Take 4 of the larger napkins.
-Then unfold them and lay them on top of each other.
- Now use 1 of the smaller napkins and unfold it and lay it on top of the big napkins.
Photobucket
- Now comes the part that is just like making those paper fans that we used to make growing up.
- Fold the napkins like an accordion…. and keep folding and folding and folding until you have folded the whole napkin stack.
Photobucket
- Then I folded the accordion in half to find the middle of it.
- This middle spot is where I secured it with the twist tie or string.
Photobucket
- Now on each end of your ‘fan’ you are going to want to cut the ends.  Making them rounded or like a half circle.
Photobucket
- Next carefully lift the smaller napkin up (remember to do it carefully so you don’t accidentally rip the napkin)
- Then cut the edge of the smaller napkin so that it is not a straight line….making it a scalloped edge.
Photobucket
- When that is done start lifting up the different layers of the bigger napkins.
Photobucket
- And then rearrange them to your liking.
Photobucket
I just love the look of these flowers.  Using the napkin makes it feel like it is almost made out of fabric.
Photobucket
These ones almost look like the flowers found on lilly pads.
Photobucket

And I just couldn’t help it.  With a new little one on the way I made some smaller ones to decorate the wall with.  I just LOVE pink and grey together!
Photobucket
Photobucket
ps….this is a great craft for kids too!

Saturday, March 26, 2011

Tissue Paper Cherry Blossom Tree

These Cherry Blossoms are a beautiful way to bring spring inside your home.


What you’ll need:
-Light Pink Tissue Paper
-Dry Branches
-Hot Glue Gun
-Scissors
-Glue Stick
-Pencil

The how to:
1- Cut the pink tissue paper into 1 1/2 inch squares.
2- Fold the squares in half, than in half again. (fold several tissue papers at once)
3- Cut the folded tissue paper into the shape of a flower petal (careful not to cut the fold)
4- Open up the folded tissue paper.  It should look like a four petal flower.
5- Use a small dot of glue stick to glue two of the four petal flowers together with the petals offsetting each other.
6- Place a blunt pencil in the center of the now eight petal flower.
7- Wrap the flower around the end of the pencil until it resembles a flower blossom.
8- Your flower is now ready to hot glue onto the dry branches.