We are happy to share our photos and tutorials with anyone interested in spotlighting our crafts. Please be sure to link to our original posts and give us credit for our work. Thank you for your consideration and respect. We hope you enjoy our blog!


Showing posts with label Valentine's Crafts. Show all posts

Friday, January 24, 2014

A Kiss Countdown

Here is a fun way to count down the days until Valentines Day.  After all...who doesn't love to get kisses?

What You'll Need:
- A bag of Hershey Kisses
- 25 - 30 inches of Plastic Wrap (like Saran Wrap) Mine was 12 x27 inches long
- Twine or ribbon


The How To:
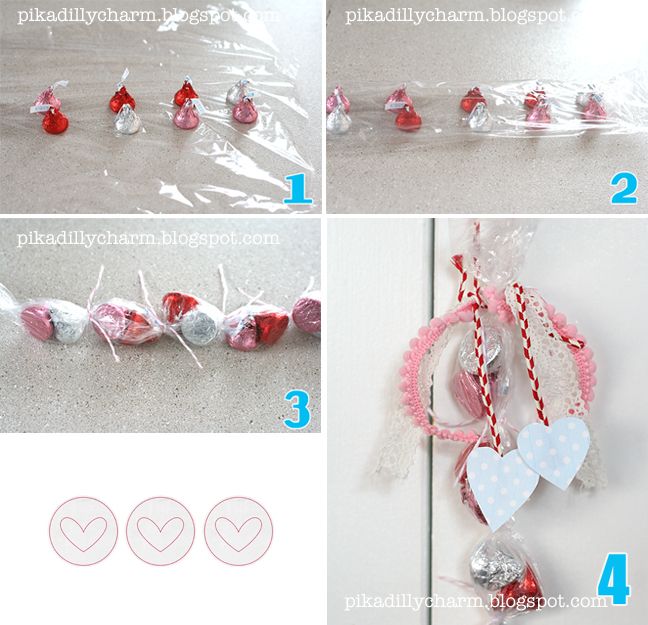
- First lay your piece of plastic wrap out on a table

- Then lay out two rows of 13 kisses on the plastic wrap.  (see photo 1 below)

- Now fold one side of the plastic wrap over the rows of kisses. And now fold the other side of the plastic wrap over the kisses. (see photo 2 below)

- Next, you will use your twine/ribbon to tie the plastic wrap into 13 sections.  2 kisses will be in each section. (see photo 3 below)

-Then you can embellish it with ribbon, hearts, or what ever you want (photo 4)
 I tied on a piece of twine that was long enough to allow me to hang the countdown on door knobs or coat hooks or whatever.

The countdown is meant to start on February 1st.

 photo KissCountdown1_zpsdbe3c124.jpg

 photo KissCountdown3_zpsa6708954.jpg

 photo KissCountdown2_zps68f6e249.jpg 

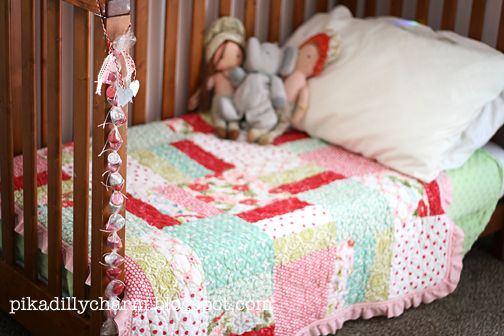
My kids are excited to start getting their 'kisses' each day.  =)

Tuesday, February 12, 2013

Fruity Soap


 photo soapg_zpsa7a2f659.jpg

What You'll Need:

- Clear pure glycerin soap (I found mine at my local craft store)

- Silicone muffin pan

- Pureed fruit, herbs, or berries of your choice


The How To:

 - First puree (or zest) your ingredients.


 photo soapb_zpsa58fe8cd.jpg


- Next, melt your pure glycerin soap according to the directions on the package.

*Note: I melted 8 blocks of my soap and it gave me 11 small soaps.

 photo Soap_zps7d0a0c39.jpg


- Now it is time to mix your different fruits/herbs/berries into the melted soap.  Be sure to start with adding small amount at first (like a teaspoon of the fruit/herb/berries at a time) until you get the desired consistency and/or color.

- Then pour/spoon it into the muffin pan.  (I put 2 Tablespoons of soap into each muffin slot)


 photo soapc_zps8fdaf093.jpg


- Let you soap cool according to the package directions (probably a couple of hours) until it is hardened.

- Next pop the soap out of the silicone muffin pan and, waalaa, you have some fruity smelling soap.


Oh and be sure to use it within a couple of months.
 photo soapf_zps7ee2d6c5.jpg

Some of the different things i tried in my soaps were: lemon, strawberry, mint.  Then a couple of combos of the above: lemon + strawberry, mint + strawberry
 photo soaph_zps93e1c685.jpg


Since Valentines is right around the corner I think my girls would think it would be fun to each get their own heart shaped fruity soap.

Wednesday, February 6, 2013

Pom pom Garland

Pom Pom garlands are super easy to make.
In fact they are a great way to use up left over yarn.

 photo pompom8_zps9d989d8d.jpg


What You'll Need:
- Yarn
- Fork (Mine was a larger salad serving fork so I could get larger pom pom's)
- Scissors
- String to hang them on (I used bakers string/twine)
-Needle or scotch tape ( for threading the pom pom's on the string)


The How To:
- The first thing you'll need to do is wrap your yarn around the fork about 60-65 times, then cut the yarn.

 photo pompom_zpsbcea1f5b.jpg


- Now cut a longer piece of yarn (I did mine around 5-6 inches long).

 photo pompom2_zps2d2ced89.jpg


- Then take that 5-6 inch piece of yarn and thread it through the bottom of the middle gap in the fork.

 photo pompom3_zps84738b0f.jpg


- Then tie it tightly around the middle of your bunch of yarn (shown in picture below).

 photo pompom4_zpse5c26b92.jpg


- Now, slide the yarn off the fork.

- Then take your scissors and cut through the loops that are on the edge of your yarn 'ball'.
  Keep cutting until all the loops are cut.

 photo pompom5_zps26e32c02.jpg


 photo pompom6_zps56adbcb7.jpg


- After you cut all the loops feel free to give the ball a little 'hair cut' and trim any long pieces off and trim it up so it looks more even.

- Repeat the steps above until you have the desired amount of pompom's.

- Next thread your needle on your string (for thicker string using a yarn needle may be easiest) or tape the end of your string to make it so you can string your pompoms on the string.

- Now just poke the needle (or taped end of your string) through the center of your pompom's.

- You are now ready to hang your pompom garland!

 photo pompom8_zps9d989d8d.jpg

Monday, February 13, 2012

Valentine Gift

This can be made for anyone....a spouse, child, grandparent, etc.

This one I made for my husband.
It was fairly easy to do and took a couple of hours to make.

I made mine pretty simple but you could really embellish it if you wanted to.
Photobucket

What You'll Need:
- A deck of playing cards
- Hole puncher
- Card stock or construction paper.
- Glue Stick
- Pen/marker
- Scissors
- Ribbon, twine, or something similar.


The How To:
- First punch two holes in each of the 52 playing cards and in one of the joker cards.
-Then cut rectangles from your card stock or construction paper that will fit on each card.
- Write a different thing that you like or love about that person on each rectangle.
- Next glue one rectangle onto each of the 52 playing card

- Then take the joker and glue your 'title' onto the back side of this card.
-Put this card on top of all of the others and then thread your ribbon through the cards and tie it together.


Photobucket

Photobucket

Photobucket

Photobucket

Thursday, February 10, 2011

More Homemade Photo Valentine's!

 Here are four more ideas for homemade Photo Valentin's!

Tips for taking Photos:
When taking the pictures for these Valentine cards you will need to have your child hold there open hand or closed fist, almost straight out in front of them.   The closer the hands are to the camera the bigger they will be in the picture.   Big hands allow more room for the treats to fit in their hands.

Download your pictures onto your computer and use a photo editing software to crop or dress up the look of your photo if desired.  Print your pictures 4x6 at a one hour photo or print them off at home.


Photo #1  (Boy Holding Bag)

-Use a hole punch to punch holes above and below the the fist.  
-Carefully pull the bag through the two holes.  
-Tie a bow around the bag below the fist.
-On the back side of the photo, tape the exposed part of the bag to the back of the photo. 
*DONE*

Photo #2 (Two hands holding heart)

-You'll want to use both hands to hold those bigger treats like sugar cookies and such.
-All you do is tape or hot glue the treat to the hands.  EASY!
*DONE*


Photo #3 (One hand holding heart)

-You'll want to use this picture to hold smaller treats, like chocolate hearts etc...
-Just like photo #2, Tape or hot glue the treat in the hand.   Simple!
*DONE*

Photo #4 (Girl holding string of treat bag)

-You'll want to use this one if the treat bag is to large to fit through the hole punch, as in photo #1.
-Use an exacto blade to make slits above and below the fist. 
-Thread the ribbon through the slits and tie knot in the top of ribbon.  That's it!
*DONE*

And that's all there is to it!  A truly sweet personal Valentine!

Monday, February 7, 2011

Homemade Valentines

Here's a different kind of valentine for your kids to pass out to their friends.

Photobucket

What You'll Need:
- Your camera

- Your kids

- Lollipops
-Computer

- Exacto knife


The How To:

- First find a place to take the picture of your child.

- Next have them hold out their arm with their hand in a fist shape (as if they are holding the imaginary lollipop)

- Then take the picture

- Upload your photo to your computer and use a photo editing software to add words on the photo if you want.

-Either print your pictures from home or send them away to a 1 hour photo developing place.

- When you get them back, use your exacto knife and carefully put a little slit above and below the hand thats a fist.

-And then slip the lollipop in those slits to make it look like they are really holding the lollipop.

- Thats it! They are ready to be handed out!

Wednesday, February 2, 2011

Felt Fortune Cookies

  In this tutorial you literally make your own fortune!


  What you'll need:
 
-Felt
- Sharpie
-Plastic/Paper cup
-Hot Glue
-Paper strips


The how to:

-Turn the cup upside down on the felt. Trace the cup with a Sharpie.


-Cut the circle out.  (Make sure you cut all the black Sharpie lines off.)


-Fold the circle in half.


-Use your index finger to hold the center while you pull the tips of the felt toward each other.


-Place a hot glue spot in the center of the fold.  (Do not glue all the way to the ends)


-Pinch the felt around the glue in the fold.

-Cut some strips of paper and write your own fortune on them.

-Slip the fortune strips inside the felt cookies along with a little treat!


Wednesday, January 26, 2011

More Than Just a Hair Clip

This fun (and easy to make) heart clip is great for more than just a hair decoration.

Photobucket

What You'll Need:
- Red Felt

- Hot Glue Gun

- Marker

- String/Strand of Red Sequins (got mine from Joann's in the ribbon section)

- Scissors

- Alligator clip


The How To:
- First draw (or trace) a heart onto the felt.

Photobucket

- Next cut out your heart.

-Now, take your glue gun and trace the outside of the heart with the glue.

- Then put the string of sequin's on the glue that is on the outter edge of the heart.

Photobucket

- When you have gone all around the outter edge, keep putting glue on the heart as your go, and spiral in as you go with the glue and sequin's.

Photobucket

- When you get to the middle of your heart, cut your sequin string and add a drop of glue to the end to help hold it in place and to help keep the end sequin from falling off.

- Now hot glue your gator clip (or whatever kind of clip you like) to the back side of the heart.

Photobucket

And that's it!

Here are some more examples of some fun ways to show off your cute heart!

Photobucket

Monday, January 24, 2011

Oh So Easy Bracelets

These bracelets make cute gifts for your kids to give to their friends!

Photobucket

What You'll Need:

- Ribbon

-Self adhesive Velcro

- Scissors

- Matches


The How To:
- First measure the ribbon to fit around your childs wrist (or your wrist if you want one).

- Next cut the ribbon a little bigger than you need so the ends over lap leaving a place to attach the velcro.

Photobucket

- Next lightly burn/melt the edges of the ribbon to prevent fraying.

- Now, if needed, cut the velcro so it fits nicely on the end of your ribbon.

- Then attach one piece of velcro to the underside of one end of the ribbon and the other part of the velcro to the top side of the other end of the ribbon.

- And your super easy velcro bracelet is ready to wear or pass out to friends.

Photobucket

Friday, January 21, 2011

Felt HeartFlower

Here's a fun way to use hearts to make a flower.


 What you'll need:

-Red & Green Felt
-Red Tulle
-Green Pompom ball
-Alligator Clip
-Needle & Thread
-Red Ribbon (Optional)
-Hot Glue


The how to:

-Cut a paper heart out of paper to use as a stencil.

-Fold the Red felt over and secure with pins.

-Place the fold of the paper heart on the fold of the felt and trace around the heart.

-Cut out the hearts.  You'll need 4 hearts.


-Cut your Tulle so it is the height of one heart and the width of 4 hearts.

-Fold the Tulle in half.  The fold should be in the center of the heart.

-With the needle and thread sew through the center of the heart on the edge of the tulle.


-Sew all 4 hearts through the center.

-Once all 4 hearts have been connected, sew through the middle of the first heart again.  This will connect the chain of hearts.


-Gently pull the thread so that the hearts cluster tightly.

-Fold back the bottom tip of each heart, and stitch the green Pompom ball into the center of the heart cluster.

-Cut two leave shapes of of the green felt.


-Stitch the leaves into place on the back of the flower.

-If desired, Hot glue ribbon onto the top half of the clip.  This will help prevent the clip from sliding out of your hair. Make sure to use ribbon with texture, like Grosgrain ribbon.

-Hot Glue your flower onto the clip.
It's done!


You can clip this flower in your hair, on a head band or even on your hat!

Wednesday, January 19, 2011

Chocolate Kiss Roses

 This is a fun and simple way to make roses!


What you'll need:

-Red & Green Cellophane
-Floral wire, 20 Gauge, 18 inch long
-Floral Tape
-Chocolate Candy Kisses


 The how to:


-First cut your red cellophane into 4x4inch squares.

-Fold your wire in half leaving a bit of a circle in the end.

-Put two chocolate kisses back to back.


-Place the tip of one of the kisses into the center of the red cellophane and wrap it around both kisses.

-Place the rounded end of the wire inside next to the kiss on the the bottom.

-Twist the red cellophane around the kisses and the wire.


-Use the floral tape to secure the cellophane to the wire, starting at the tip of the bottom Chocolate kiss.

-Wrap the floral tape all the way down the wire.


-Next, cut a 2x4 inch piece of green cellophane.

-Fold it in half horizontally first, then vertically.

-This is going to be the leaf.


 -Place the open end of leaf about 1 1/2 inches below the rose. The folded end should be up by the rose.


-Use your floral tape to secure the leaf to the stem. 

-Rip off tape about and inch below the leaf.

-Add a little character to your rose by curling the end of the stem around your finger.


Make a dozen roses and wrap them up or display them any way you want!